I put this page together a few years ago (in 2004) to document the Sopwith Camel project that my late father had started. Please enjoy the pictures! -Ron
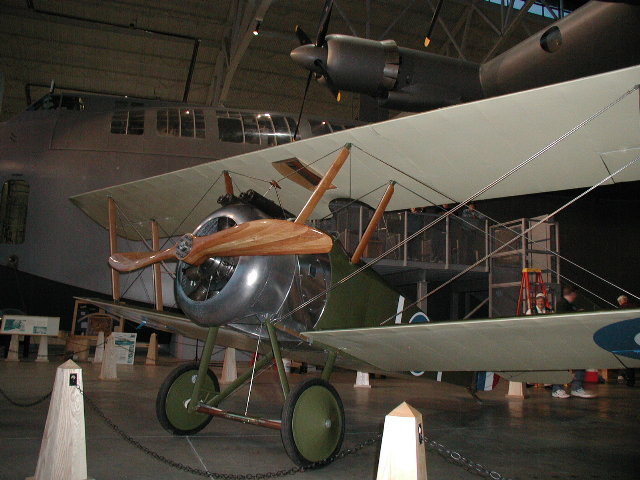
Sopwith Camel at Evergreen Aviation Museum - December 2004
The folks at Evergreen Aviation Museum were kind enough to accept the airplane on a long-term loan for display purposes. The museum is an absolutely first-class facility, and I am very happy to be able to have the airplane there. It sits in fine company under the Spruce Goose, and nearby many other aircraft that were important in the history of aviation. I'm very happy that many people will now be able to see this airplane for years to come. I encourage all of you to visit sometime.
I'd like to say thanks again to my friends and family members that helped out and made all of this possible.

In 1989 my father had a dream of building a Sopwith Camel biplane. He wanted to do it all by hand, respectful of the people who built the original versions of this airplane back in 1917. Unfortunately, he died in 1999, with his project nearly finished.
Three years later, I took up where my father left off, determined to finish the airplane in a manner that would make our family proud. On September 3, 2004, with the help of friends and family members, we rolled out the finished product.
It is my hope that people will see this airplane, remember my father, and recall the simple fact that with enough determination and steadfast effort, remarkable things can be achieved.
Ron Rinaldi
September, 2004
Sopwith Camel on Display - September 2004
We had an absolutely great time showing this airplane in Mom's backyard! It is really quite an impressive machine. Everyone in my immediate family was there for the celebration, and relatives and friends came from all over. Thanks to everyone who was able to attend and make this occasion special. Please Click on the link above and spend a few minutes looking over the pictures of the airplane and our celebration.
Assembly - August 2004
Finally, the assembly of the whole airplane is happening! Its actually taking a while, as things get cleaned up and polished. We just finished moving the fuselage into the back shed so we could put on the upper wing Center Section. Click the link above to see some pictures of where things are now.
Decals - August 2004
Well, this was an interesting project! Kind of nerve-wracking, but it turned out well. With the help of some friends and family I was able to paint the decals on the wings and fuselage sides. (Since I couldn't find any large stick-on decals, I figured I'd have to use paint!). Anyway, this pretty much completes the painting process. I still have some touch-up work, but soon it will be time to put all these pieces back together. Click on the link above to see a few more pictures of how we did this.
Painting - July 2004
I have once again started working on the Camel project! It has been a while since I've been able to do much with it, as I had to take some time off to do some "real work." But I'm committed to finishing the project and having it on display in the backyard on Labor Day this year. (Mark you calendars).
About all that is left is the painting and final assembly. Here you see the upper wing center section has gotten its coat of "olive drab". Click on the link above to see a few more pictures of the progress
Odds and Ends - August 2003
Its been a pretty slow month for getting things done on the airplane. Summertime in Oregon seems to have a lot of distractions. I did manage to put Ryan and Nick, my nephews, to work helping me buff out the aluminum cowling. Also, I did get a fair amount of work done covering the tail surfaces, and a little more on the fuselage as well. Click on the link above to see a few more pictures of the progress
Fuselage Covering - July 2003
I knew it was time to start covering the fuselage when I looked around the shop, and it was the only thing left without any fabric! At first, I thought it would be a big challenge, but so far it is going well. Of course, I still have to apply all of the coatings yet to vertical and overhead surfaces. So it will be interesting to see how that works out.
The right side fuselage fabric on the Sopwith Camel had a kind of a unique feature. The designers put in a seam down the middle, which was laced together with cord. The idea was that it would be easy to open up the side of the fabric for servicing. For example, let say someone was to shoot a few bullet holes in the fuel tank (luckily missing the pilot of course). You'd just cut the cord to get access to the tank, and then lace it back together when you are done. I'm not sure how it worked out in actual practice back then, and they certainly don't have these seams on many aircraft made since then. Of course, bullet holes in fuel tanks are less of a problem now, too! click on the link above to see the details.
Wheel Covering - June 2003
My sister Janet decided to visit for a long weekend during Mom's birthday. (Happy Birthday, Mom!) So we decided that since she knew a lot about sewing, it would be a great time to try to fit the fabric wheel covers to the the airplane wheels. Besides, I just borrowed this great sewing machine from Larry and Marge Davis (Thanks Davis's!), and I really didn't want to tell Larry that I had no idea how to work it! Anyway, it all went very well, with only a minor false start, and soon we had fabric on the wheels.
The wheels are made the same way as original WW-I aircraft wheels. In fact, I am told that these wheels came from the same factory in England that produced wheels for the original Sopwith Camels back in 1916. The rim on each wheel has a number of holes on each side, just for the purpose of attaching the fabric. Also the plans for the airplane depict the little wire clips that are to be sewn into the fabric and hooked into these holes. Click on the link above to see pictures of how all of this was done.
Fabric covering continues - May 2003
I had no idea that covering an airplane would be this much work! The work is not difficult once I learned how to do it. But there is just so much airplane here! Originally I had figured it would take a couple of months to do this job. Well, its been a couple of months, and I'm not even half way done! But, so far it is going well and I am enjoying the experience. (Well, most of the time anyway -- Hey it beats working for a living!).
Click on the link above to see some more photos. You'll see that I really am making progress here!
Fabric covering (in progress) - March 2003 (and into the forseeable future).
Finally, the "big job" is here. Covering the airplane with fabric had always been the last big step in transforming this project into a real airplane. There will still be a lot of little things to finish off once this step is done, but there definitely is a light at the end of the tunnel.
I decided to use the Poly-Fiber process for the covering. It is a modern-day aircraft covering and painting system that is in widespread use for fabric-covered airplanes today. It would have been more authentic to use Irish linen fabric and nitrate dope like they did back in 1916. However, it seems to be very difficult to use those materials with much success for someone as inexperienced as I am. Plus, those materials result in airplanes that are extremely flammable, and surfaces that tend to crack and peel after a few years. Poly-Fiber uses polyester fabric and vinyl coatings that don't have those problems, and is also very easy to use. So it seemed like a good fit for my purposes.
After spending a couple of weeks getting the shop ready and varnishing and priming the wing parts, I'm covering. Click on the link above to see pictures.
Machine Gun Chutes & Side Doors -
February 2003.
The machine guns that we have acquired for the airplane are originals, but have been modified so that they are no longer operational. I know very little about guns, especially machine guns. But I have figured out that there seem to be three "byproducts" from firing a gun such as this. First, there is the bullet (obviously) which goes out the front. Then you have the "clip" which is a little device which holds each bullet to the next one to form the belt which goes into the gun. Clips get ejected to the side. Finally you have a shell casing which falls out of the bottom of the gun.
All of this action happens in the part of the gun that is undereath the gun faring. So the aircraft designers had to come up with a way to direct the clips and shell casings over the side of the airplane. I suppose they didn't want them coming into the cockpit and cluttering things up, or jamming controls, or anything like that. Anyway, they arranged for a series of chutes made of sheet metal to accomplish this.
Well, like I said, these guns cannot be fired, so there won't be any clips or shell casings being ejected. The chutes are not really needed on this airplane. But I decided to build them anyway, since they are a visible part of the airplane, and besides, I thought it would be fun and quite challenging. (Fun? Geez, what was I thinking??) Click on the link above to see how these are made.
Motor (not yet completely installed) -
January 2003.
We have an original "rotary" aircraft engine of the type that was used on the
Sopwith Camel toward the latter part of the war. Made in France, it is
the "Gnome 9N Monosoupape," rated at 160 horsepower turning at (only) 1450
RPM. The entire engine rotates on a fixed crankshaft. It is a
very strange arrangement, but this was apparently the best way to cool
the engine back then.
It uses castor oil to lubricate the engine (castor oil will not mix with
gasoline), and has no oil recovery system. This means that hot oil is
flung out from the spinning engine, and gets ALL OVER the place.
That's one reason pilots wore goggles back then. And hey, don't forget
that we will have that cool windscreen. Click on the link above for some
more pictures.
Windscreen - January 2003.
They call the front windshield the "windscreen" on the
plans. It probably makes sense, because I doubt that it
does much "shielding" at all. It is a very small, funky little
thing, but I think it looks pretty cool.
Cockpit Coaming - December/January
2003.
The cockpit coaming is a leather pad that lines the rim of the cockpit
opening. This one is not quite finished yet, but I'm so proud of it that
I just had to show it off now! This has probably been the most rewarding
project I have done so far on this airplane. When I started it, I
really had no idea how I was going to do it, nor did I have any
experience working with leather. But with a lot of planning and
patience (i.e. the project progressed very SLOWLY!) , it seems
to have worked out very well. Click on the above link for the
construction photos.
Center Section Sight - December
2002.
The Sopwith Camel has some very distinctive features. One of these is a
"hole" in the upper part of the wing. Its right above the pilot's head,
and gives a view of what is above (or below you if you are upside
down). It is called the Center Section Sight, and as I found from
reading the plans, it is much more than just a hole. There are side
plates (called "wash plates") and a front and rear faring on the inside of the
hole. Click on the link above to see how I was able to construct the wash
plates and farings.
Tie Down Rings - November 2002.
One of the items I just completed is a pair of tie down rings. The
rings attach to the bottom of the lower wings, and are used to tie the airplane
down during periods of high winds. All airplanes have them,
even today. Click the link above to see some pictures of how these
rings are made. I followed the plans, right down to the "cut
off one side of a bolt and weld it to a piece of steel" method they
used way back when.
The wings come off! - October 2002.
With the help of my brother John, (yes, and Mom helped, too), I was able to
remove the wings from the fuselage. I will now be able to work on each wing
independently as I am getting them ready for cover. Also, I have much greater
access to the fuselage for mounting the motor, and installing a windscreen and
other things that I have yet to build. Click on the link above for pictures of
the wing removal.
Inspection Covers / Fuselage step - September
2002.
I finished making and installing the inspection covers on the leading edge of
each wing. There are four altogether, and are built exactly as shown on the
plans. They are kind of unique in that they are clear little "windows" to allow
pilots and mechanics to inspect the aileron pulleys once the wings are covered
and the airplane is operational. I don't know that I've ever seen this kind of
inspection cover on any other type of airplane.
Next will be fitting the pitot lines into the leading edge of the upper wing. After that, I should be ready to remove the wings and start getting them ready for cover.
Rigging photos - August 2002.
Here are some photos of the aircraft rigging which has to do with making sure
the wings and tail surfaces are positioned correctly, and the various struts
and "flying" wires are holding things together properly. Also shown are some of
the cable hook-ups to the aircraft control surfaces.
The control cables seem a little complex for a manual airplane, but you have to remember that this is a fighter aircraft, albeit an early one. It has redundancy in all three controls, including aileron, rudder, and elevators. That is to say that if one rudder cable was shot out by an enemy aircraft, (apparently a frequent occurance), you still have another operating cable.
Sopwith Camel Pictures - The originals.
Back in 2001, While still living in Massachusetts, I visited my mother out in
Oregon and took a few pictures on the Sopwith Camel as it was back then. At
this point, nothing had been touched since Dad left us back in 1999. We miss
you, Dad.
Here are some pictures of the kayak, which is going together in the back room.
Pictures of the Big Trip Across the country.
When I moved from Massachusetts to Oregon in April, 2002, I flew in my own
light airplane. I took my time, and visited a fair portion of the country. Here
are a few pictures of that trip.